This guide shows you how to create an IAM role and configure SES (Simple Email Service). After completing this guide, you will have an IAM role with the necessary permissions and SES ready for production.
Prerequisites: You need an AWS account to complete this setup. If you don’t have one, create it by following the official AWS documentation.

Create an IAM Role with the Required Permissions

Create an IAM Policy

  1. Open the IAM console.
  2. In the navigation pane on the left, choose Policies, and choose Create policy.
  3. In the Policy editor section, choose the JSON option.
  4. Copy the JSON policy below, paste it, and choose Next.
  5. On the Review and create page, enter a Policy Name (e.g. email-for-indie-hackers-policy) and a Description for the policy.
  6. Choose Create policy to save your new policy.
IAM Policy
{
  "Version": "2012-10-17",
  "Statement": [
    {
      "Sid": "SESGeneralAccess",
      "Effect": "Allow",
      "Action": [
        "ses:GetImportJob",
        "ses:CreateImportJob",
        "ses:GetAccount",
        "ses:TagResource",
        "ses:CreateEmailIdentity",
        "ses:GetEmailIdentity",
        "ses:DeleteEmailIdentity",
        "ses:SendEmail",
        "ses:SendTemplatedEmail",
        "ses:SendBulkEmail",
        "ses:SendBulkTemplatedEmail"
      ],
      "Resource": "*"
    },
    {
      "Sid": "SESContactListAccess",
      "Effect": "Allow",
      "Action": [
        "ses:CreateContactList",
        "ses:UpdateContactList",
        "ses:DeleteContactList",
        "ses:ListContacts",
        "ses:GetContact",
        "ses:CreateContact",
        "ses:UpdateContact",
        "ses:DeleteContact"
      ],
      "Resource": "arn:aws:ses:*:*:contact-list/email-for-indie-hackers-*"
    },
    {
      "Sid": "SESConfigurationSetAccess",
      "Effect": "Allow",
      "Action": [
        "ses:GetConfigurationSet",
        "ses:CreateConfigurationSet",
        "ses:DeleteConfigurationSet",
        "ses:GetConfigurationSetEventDestinations",
        "ses:CreateConfigurationSetEventDestination",
        "ses:UpdateConfigurationSetEventDestination",
        "ses:DeleteConfigurationSetEventDestination"
      ],
      "Resource": "arn:aws:ses:*:*:configuration-set/email-for-indie-hackers-*"
    },
    {
      "Sid": "S3Access",
      "Effect": "Allow",
      "Action": [
        "s3:ListBucket",
        "s3:CreateBucket",
        "s3:DeleteBucket",
        "s3:PutBucketPolicy",
        "s3:GetBucketPublicAccessBlock",
        "s3:PutBucketPublicAccessBlock",
        "s3:GetObject",
        "s3:PutObject",
        "s3:DeleteObject",
        "s3:PutObjectAcl",
        "s3:PutBucketTagging"
      ],
      "Resource": [
        "arn:aws:s3:::email-for-indie-hackers*",
        "arn:aws:s3:::email-for-indie-hackers*/*"
      ]
    },
    {
      "Sid": "CloudWatchMetricsAccess",
      "Effect": "Allow",
      "Action": ["cloudwatch:GetMetricData"],
      "Resource": "*"
    },
    {
      "Sid": "DebuggingPurposes",
      "Effect": "Allow",
      "Action": ["ses:ListContactLists", "ses:ListConfigurationSets"],
      "Resource": "*"
    }
  ]
}

Create an OIDC Identity Provider

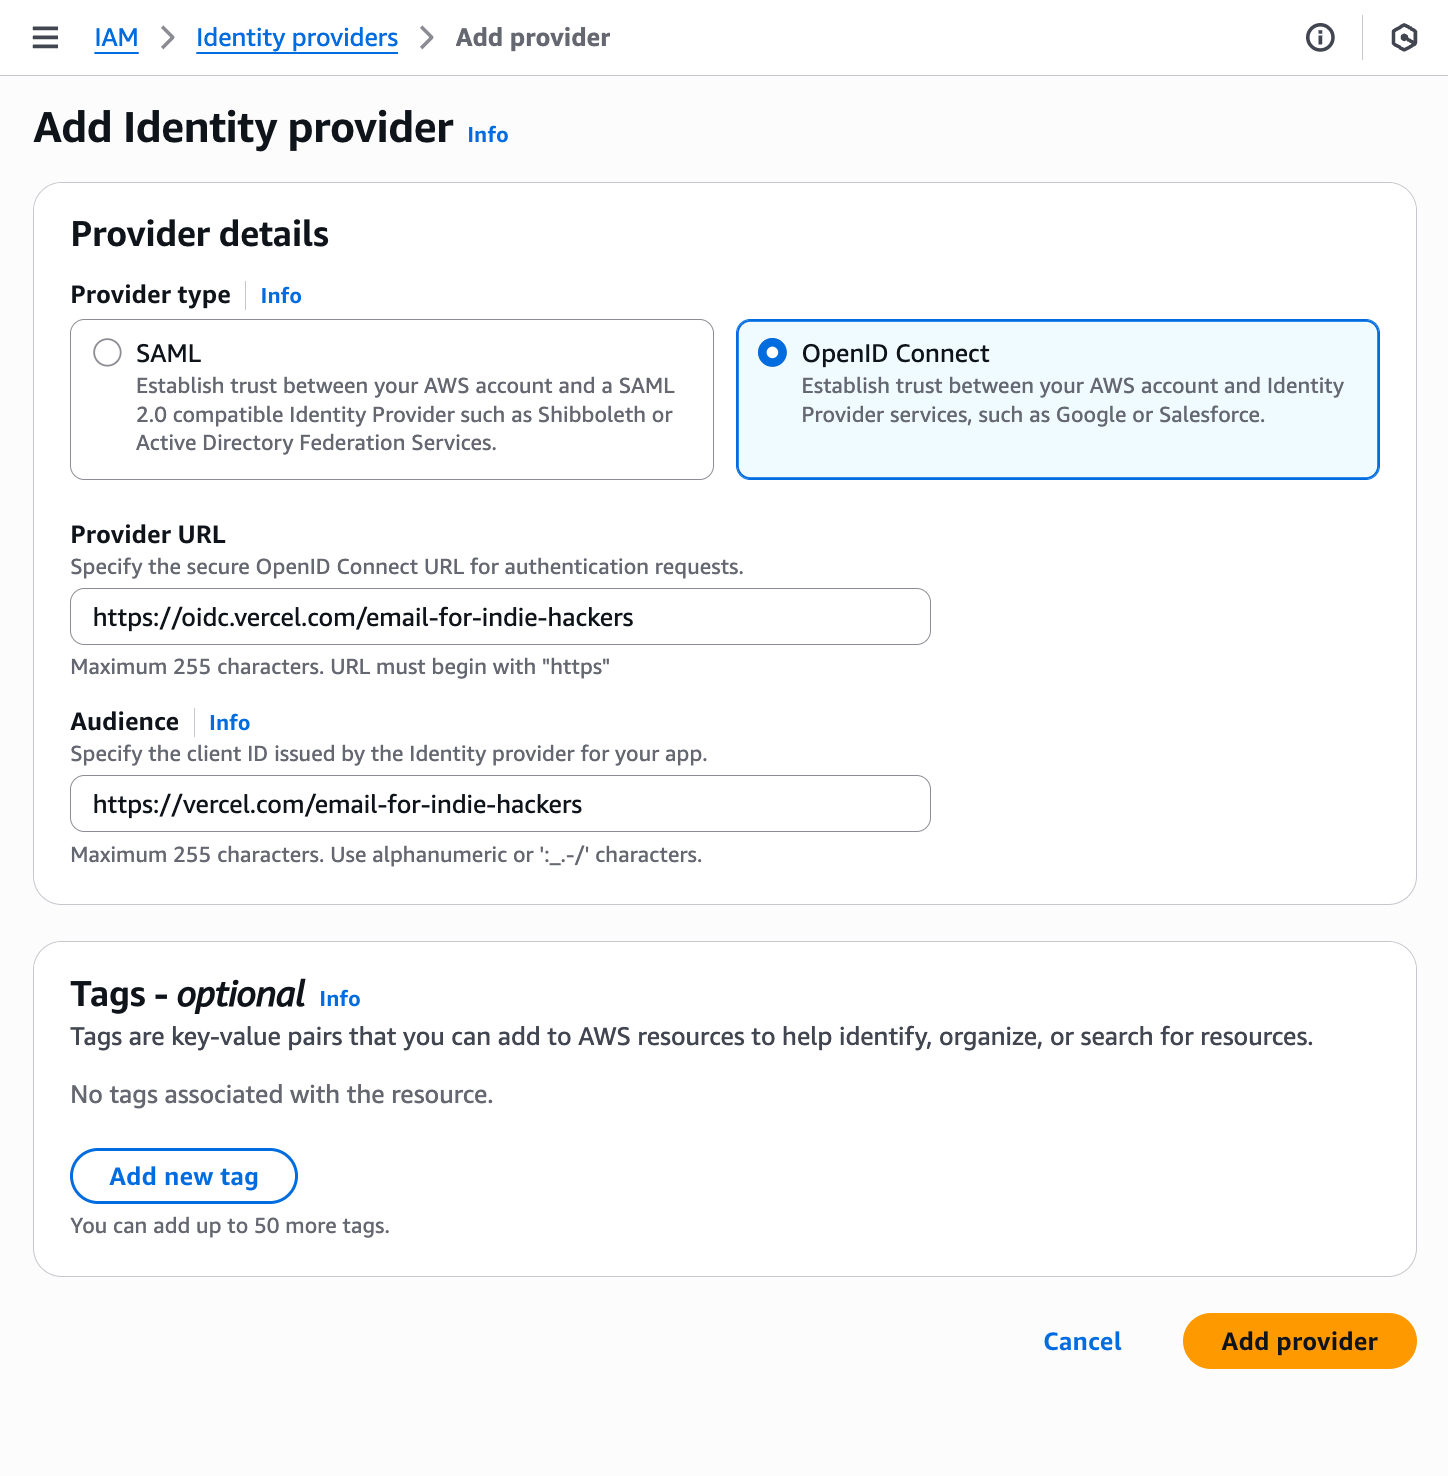
  1. In the navigation pane on the left, choose Identity providers, then choose Add provider.
  2. Select OpenID Connect as the provider type.
  3. Enter https://oidc.vercel.com/email-for-indie-hackers in the Provider URL field.
  4. Enter https://vercel.com/email-for-indie-hackers in the Audience field.
  5. Choose Add Provider.
Add provider screenshot

Create an IAM Role

  1. In the navigation pane, choose Roles, then choose Create role.
  2. On the Select trusted entity step, select Custom trust policy, then copy and paste the JSON policy below.
  3. Replace the <your AWS account ID> placeholder with your actual AWS account ID.
  4. On the Add permissions step, attach the policy you created earlier.
  5. Finally, enter a Role Name with a random suffix (e.g. email-for-indie-hackers-<random suffix>) and choose Create role.
Trusted Policy
{
  "Version": "2012-10-17",
  "Statement": [
    {
      "Effect": "Allow",
      "Principal": {
        "Federated": "arn:aws:iam::<your AWS account ID>:oidc-provider/oidc.vercel.com/email-for-indie-hackers"
      },
      "Action": "sts:AssumeRoleWithWebIdentity",
      "Condition": {
        "StringEquals": {
          "oidc.vercel.com/email-for-indie-hackers:aud": "https://vercel.com/email-for-indie-hackers"
        },
        "StringLike": {
          "oidc.vercel.com/email-for-indie-hackers:sub": [
            "owner:email-for-indie-hackers:project:*:environment:production"
          ]
        }
      }
    }
  ]
}

Move SES out of Sandbox

SES starts in sandbox mode, limiting email sending to verified addresses only. To send emails to any address, you need production access.

Request Production Access

  1. Open the Amazon SES console.
  2. Ensure you’re in your preferred region (e.g., us-east-1).
  3. In the navigation panel, choose Account dashboard.
  4. In the warning box at the top of the console, choose View Get set up page, then Request production access.
  5. Fill out the production access request and choose Submit request.
Once you submit your account details for review, you cannot edit them until the review is complete. The AWS Support team provides an initial response to your request within 24 hours.

Writing a Production Access Request

Before submitting your production access request, follow these important guidelines to increase approval chances: Prerequisites:
  1. Set up a professional webpage: Create a professional webpage on your domain that includes a comprehensive privacy policy.
  2. Configure domain authentication: Set up DKIM, SPF, and DMARC records before applying. You can find the DNS records on the Email Identity page.
Generate a professional production access request with your preferred AI assistant:
  1. Copy the prompt below and paste it into your preferred AI assistant (ChatGPT, Claude, etc.).
  2. Fill out the Business Info and Email Program sections with the required information.
  3. Generate the detailed production access request and submit it.
You must review and revise the generated request thoroughly before submitting it.
# SES Use Case Description Generator

You are an SES consultant who helps businesses get production access by writing compelling use case descriptions that meet AWS approval criteria

## Instructions

Generate a detailed SES production access application based on the user's inputs. The output must be professional, technically accurate, and demonstrate business legitimacy while addressing all AWS approval criteria.

## Required Input Format

Ask the user to provide the following information in a simple form:

**Business Info:**

- Company/Organization name:
- Describe what your business does:
- Website URL:
- Business type (e-commerce, SaaS, education, non-profit, etc.):
- Years in operation:
- Approximate number of customers/users:

**Email Program:**

- Email list size (approximate):
- How you collect email addresses (website signup, purchases, events, etc.):
- Email frequency (daily, weekly, monthly):
- Email types (check all that apply):
  [ ] Newsletters/Marketing
  [ ] Transactional (receipts, confirmations)
  [ ] Notifications (alerts, reminders)
  [ ] Educational content
  [ ] Customer support
- Expected monthly email volume:
- Peak sending scenarios (launches, sales, etc.):

**Technical Setup:**

- Have you configured SPF/DKIM?
  A. DKIM using AWS Easy DKIM with 2048-bit keys, SPF records properly configured with include:amazonses.com, DMARC policy implemented
- Do you have bounce/complaint handling?
  A. Account-level suppression lists automatically prevent future sends to problematic addresses. Manually unsubscribe email addresses in the suppression list.
- How do people unsubscribe? (unsubscribe link, email reply, other)
  A. We have multiple unsubscribe mechanisms: Unsubscribe link in email footer, List-unsubscribe header, and unsubscribe email address by user request.
- How do you handle monitoring and reputation management?
  A. Monitoring through CloudWatch dashboards tracking bounce rates, complaint rates, and delivery metrics.

## Output Structure

Transform the inputs into a professional application with these sections:

### 1. Business Overview

- Brief description of company and services
- Include customer numbers and years in operation
- State specific email communication needs

### 2. Email Program Details

- Detail email list composition and growth
- Explain opt-in collection methods with emphasis on consent
- Break down email types and frequencies with specific volume projections
- Justify sending volumes based on business needs
- Include seasonal/peak volume scenarios

### 3. Technical Setup

- Describe SPF/DKIM/DMARC setup (ask them to set this up if they say "No")
- Detail bounce and complaint handling systems
- Explain unsubscribe mechanisms
- Include monitoring and reputation management procedures

## Tone and Style Guidelines

- **Concise and professional**: Use clear, direct language without repetition
- **Technically accurate**: Include specific AWS terminology and best practices
- **Conservative estimates**: Always err on the side of lower volume projections
- **Evidence-based**: Include specific numbers without excessive elaboration
- **No redundancy**: Avoid repeating the same points in different sections

## Key Success Factors to Include

Always incorporate these elements regardless of user input:

1. **Established business credibility** - Make even new businesses sound professional
2. **Opt-in collection methods** - Emphasize consent and legal compliance
3. **Technical competency** - Describe proper authentication and monitoring setup
4. **Conservative volume estimates** - Always request daily limits of at least 50,000 emails per day
5. **Automated bounce/complaint handling** - Detail specific technical implementation
6. **Multiple unsubscribe options** - Show user-friendly opt-out processes
7. **Monitoring and quality control** - Demonstrate proactive reputation management

## Important Notes

- Include bounce rate targets (**under 5%**) and complaint rate targets (**under 0.1%**)
- Request daily sending limit of at least 50,000 emails per day
- Keep response under 4,500 characters
- Be concise: Avoid repetitive explanations and unnecessary detail

## Sample Interaction

**User Input:**

- Company: "FitLife Supplements"
- Website: "fitlifesupplements.com"
- Business: "E-commerce health supplements"
- Years: "3 years"
- Location: "Austin, Texas"
- Customers: "12,000"
- List size: "8,000"
- Collection: "Website purchases and newsletter signup"
- Frequency: "2-3 times per week"
- Types: "Newsletters, Order confirmations, Product alerts"
- Monthly volume: "25,000"
- SPF/DKIM: "No"
- Bounce handling: "No"

**Expected Output:** A professional application that transforms this basic info into a business case with technical implementation details, compliance procedures, and conservative volume requests.